|
Expedition Training Manual
Expedition training is often
a difficult balance between cramming the
instruction into a very restricted programme and
meeting the needs of a diverse group of young
people, many of whom struggle with abstract
concepts and/or find it difficult to maintain
attention for more than a few minutes. The
programme is therefore designed to minimise
'classroom' work and spend as much time as
possible 'learning by doing'. In
2002, both Bronzes and Silvers needed more time
in the field before being submitted for
assessment, so the programme below incorporates
three
practice weekends.
This - and indeed every other aspect of
this document needs to be reviewed in the
context of the specific young people in any
year's group. Contents 1.
Training Requirements 2. Programme 3. Sessions
3.1 Introduction 3.2 Basic map reading 3.3 1st Practice Weekend 3.4 Wash-ups (reviews) 3.5 First Aid training 3.6 Purpose work/Route planning ('manual' and 'Anquet' supported) 3.7 2nd Practice Weekend 3.8 Pre-assessment checks 3.9 Assessment hike 3.10 Report preparation and presentation
4.
Assessment 5. Forms 6.
Useful Sources Appendices 1. 'Competencies' 2. Kit list 3. Briefing sheet - small group navigation exercise 4. Briefing sheet - team navigation exercise 5. Specimen short walk 6. 'Purpose Work' suggestions 7. Routecard spreadsheet 8. Specimen Menu
Section 1: Training Requirements
The training to be signed off in each participant's record book covers:
· First aid and emergency procedures · Awareness of risk and health and safety issues · Navigation and route planning · Campcraft, equipment and hygiene · Food and cooking · Country, highway and water sports codes (where appropriate) · Observation, recording and purpose · Team building · Proficiency in mode of travel
Of these, elements of four (first aid, basic map skills, route planning and purpose planning), demand classroom conditions.
A breakdown of each of the categories, with evidence of competency, is included as Appendix 1. This can be used as a checklist to ensure that all syllabus areas have been covered, and that individuals have demonstrated their competence where this may be in doubt.
All participants must attend all the training sessions (if necessary through absence, a one-to-one session should be arranged. Where unavoidable, it may be acceptable for individuals to miss part or all of either Practice Weekend #2 or #3: the instructor must decide on the basis of that individual's existing skill level and fitness. Nobody can participate without having completed one of these two practice weekends.
Before signing the book, the instructor should be satisfied that, as a minimum, the individual is capable of fulfilling the requirement with the support of someone else in the group. If no-one in the group is fully competent then none should be signed off.
Section 2: Programme
Phasing of the programme is important if interest is to be maintained, injuries are to be recovered from, and learning is to be retained.
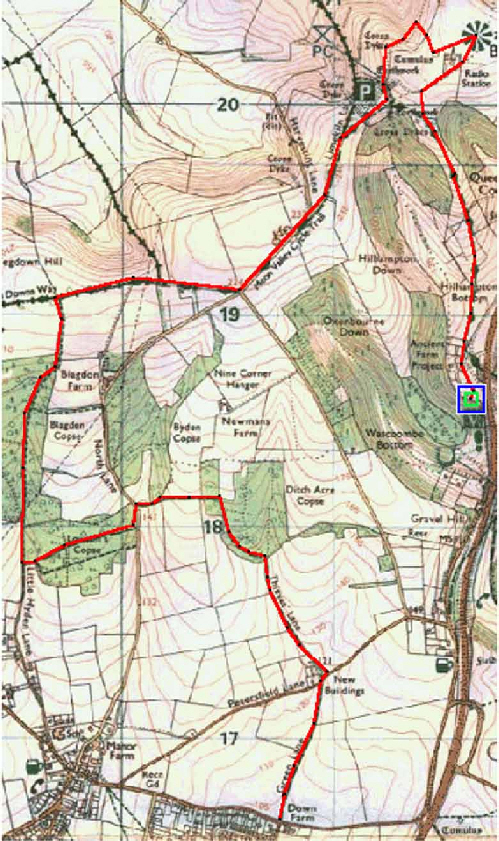
The programme is constrained by the start of the Expedition season (1st April) and by the need to work in parallel with the Skills section. Practice Weekend #1 is held at Queen Elizabeth Country Park. This date may have to be moved if they have other events scheduled for this weekend.
The apparent constraint of the 8 week lead time for HP2 submission can be minimised by this level of planning, and the recognition that an update will inevitably be required 2 weeks before the event.
Week Session/Activity
1 Identify and provisionally book assessor(s) Reserve camping at QE Country Park 6 Submit HP2 for weekend Half term 11 Submit HP2 for weekend 12 Introduction 14 Basic map reading
1st Practice Weekend 15 Submit HP2s weekend Wash-up Easter holiday 18 First Aid Course 19 Submit HP2 for weekend Purpose/Initial draft route 2nd Practice Weekend 20 Wash-up 21 Submit HP2 for weekend Route plan (2) Half term 24 Route plan (3) 3rd Practice Weekend (Bronzes 14-15/6 only) 25 Wash-up 26 Purpose Work planning 27 Pre-check (Bronze) Assessment hike (Bronze) 28 Wash-up 29 Pre-check (Silver) Assessment hike (Silver) 30 Wash-up Summer holiday 36 Report preparation (1) 37 Report preparation (2) (Silvers only) 38 Report preparation (3) 40 Report presentation
Relationship of training requirements to programme
Section 3: Sessions
3.1 Introduction
Objective
To outline the training programme To give a taste of the activities involved To obtain some appreciation of existing knowledge and experience
Materials
Flipchart and pens, blue tack or masking tape At least two trangia stoves
Preparation
:
(a) a compass rose a)
List of headings:
· Think · Walk ·
Find · Carry · Remember · Camp · Cook · Tell · On your own!
Process
Get the group sat down in front of flipchart a) and invite them to call out what they think about each word in turn (e.g. We're doing an expedition - what do we need to 'Think' about?). What you're looking for is:
· Think of a purpose for going for a walk, and where you'd like to go · Walk 25 Km (15 miles) · Find your way round - how? Map & compass. Turn up diagram, get crowd to shout out cardinal and sub-cardinal points Break off for a run-around game involving the 4 walls and 4 corners (if they get too good, swap N for S!) · Carry everything you need - what would you need? · Remember the Country Code - what's that? · Camp one night - who has camped out? · Cook supper and breakfast - on one of these. Open and assemble a trangia (use one of last year's to do it). Talk about safety. Break off and split into two teams for a relay race, first to open and assemble - bit by bit- and then a re-run to do the reverse · Tell the Assessor about the walk and how you achieved your purpose · On your own! Scary stuff: what do you do if you are lost, hurt, soaking wet?! Section 3: Sessions
3.2 Map reading basics
Objective
To introduce the most common symbols To introduce the concept of contours To understand the role of grids in referencing position, and showing distance and direction To emphasise the undesirability of road walking To give practical experience of using the above and obtaining symbol information from a map
Materials
OHP OHP slide of 'map' with overlays for contours and grid Contour model Flip chart and masking tape/blue tack 4 Sets of Red, Green, Blue and Black (orange & yellow if possible) Flipchart pens Maps for Symbol information
Presentation
What is a map? (simplified picture, scale model)
OHP Map - Work through audience asking them to identify each feature (wait their turn or until invited!)
§ Woodland (Coniferous, Deciduous, Mixed) § Footpath § Bridleway § Motorway, Major road, Secondary road (>4m), Minor road (>4m), Other road, drive or track (fenced and unfenced) § Buildings § Pylon line § Railway § Contours
Which roads are best to walk on (None of them! Some are less bad - which?) Why are there 2 types of path markings? What is the difference between the two areas of woodland? What is the safest way to get from one wood to another? Where would you find information on what map symbols mean? (Key at bottom/side)
Contour overlay - What are these lines? What do they tell us?
Contour Model - (Base only) This is how a hill looks on the map. You have to look at the numbers and imagine the area inside each ring as being higher or lower than that outside. (Demonstrate with model)
This is a hill - what would it be if the numbers where reversed?
Look at the orange road above the motorway - does it go uphill or down? Now take the same road below the motorway - up or down?
Grid overlay -These lines appear on all Ordnance Survey Maps - what are they for? (Referencing locations) How do we get a 'grid reference'? Why do we need them? (To tell other people where we are/where we are going to be) Which square is the railway bridge in? What about the motorway junction? How could we refine these references? (Imagine each square is divided into ten parts) What are the more accurate references of our two locations? How big are the squares? (Depends on the scale of the map - 2 cms for 50,000, 4 for 25,000) What distance is this on the ground? (1 Km) How far is it from the Motorway junction to the trig point? (Almost 2 Kms) What directions do the lines run in? (S-N, W-E) We will learn that there are several versions of North, but this 'Grid North' will do for the time being.
Any questions?
Exercise
Split into 2/3s, each to draw a map showing:
A hill A wood (mixed) 2 roads A house A Church with a spire A radio mast A river A lake A footpath winding through these
Each group to be supported by worker with map for 'new' symbols.
Review
Supervisor to draw and label grid. Whole group to visit each map. Each map group to: Describe walking along footpath Give grid references of Church and Radio Mast
Applause for effort.
Section 3: Sessions
3.3 Practice Weekend #1
Objectives
To consolidate map reading learning from 3.2 above. To introduce team working, stove safety, camp skills, country and highway codes and walking with a pack As far as possible to make this a fun weekend
Materials
Enough skilled leaders*, laminated maps of QE Park and compasses to allow 1:2 or 3 young people Kit for overnight stay for all - packed in rucsacs (see Appendix 2) Food Gas Games
* required for small group navigation exercise only
Programme
Saturday 11:00 Arrive on site, book in, go to top of park (near Orienteering Point 16 (OP16)) 11:30 Small group navigation (3.3.1) 13:00 Lunch 13:30 Game - kickabout? 14:00 Tent pitching (3.3.2) 15:00 Team navigation exercise (3.3.3) 17:00 Bus to camp site (other side of road) Pitch tents, roll out sleeping bags, stow kit 18:00 Stove safety demonstration - followed by heavily supervised cooking (3.3.4) 19:00 Wash up, tidy site, fun and games
Sunday 07:00 Reveille, issue food, supervise cooking, washing up, striking camp, packing rucsacs (3.3.5) 09:00 Least able team starts walk (3.3.6) 09:30 Other team starts 13:00 Pick up by mini-bus, transport home
Section 3.3 Practice Weekend #1
3.3.1 Small Group Navigation Exercise
Objectives
To introduce the following
Practical Map Skills a) Setting the map (1) Align map with point features. b) Setting the map (2) Align the map with line feature(s). c) Directions from map Use set map to identify general directions and line of route. d) Position Use features to estimate position f) Following a route Assess each leg before starting (direction, terrain, distance, time) Tick off features Compass Skills a) Cardinal/inter-cardinal (4) Know cardinal points and identify positions between. b) Setting the map Orientate the map by compass c) Care Protect from physical damage and magnetic interference. Materials
Laminated map of QE Country Park and Compass to every 2 or 3 young people List of checkpoints (see below).
Briefing
Each leader will need a briefing sheet (see Appendix 3) and sufficient materials for his/her allocation of young people. He/she will go through the following process.
Process
Spend some time making sure that each person understands the basic symbols of map (paths, fenced/unfenced roads, types of forest, Grid Lines (size of squares and direction). The red blobs are about 100m in diameter, with the appropriately marked and numbered post in the centre of the circle.
For each candidate, follow the same process. Get them to § Set map (using compass or features) § Plan a route § List any useful features (including ones that show they have overshot) § Estimate time (assume 20 minute Kms) § Follow the planned route (ticking off features) § Relocate when unsure of position (get them to do this a lot!)
Relocation strategy is to: a) Re-set map and look for relevant features and, if none, b) Walk on a fixed bearing (N, S, etc.) until striking a likely line feature, then restart at a). Do the allocated row of Orienteering points in the set sequence, with candidates taking turns (his/her row will be highlighted by the event leader).
Take opportunities on tarmac roads to check highway code.
Break off in order to be at the toilets (GR 7205 1855) no later than 13:30 (subject to change if start time slips).
As far as possible, KEEP IT SIMPLE!
3.3 Practice Weekend #1
3.3.2 Tent Pitching
Objective
To demonstrate best practice in handling tents To gain opportunity to consolidate this when pitching camp, later To encourage group organisation and support
Materials
Tent complete, in bag, for every 2 or 3 young people
Process
Two leaders demonstrate tent
pitching, giving special emphasis to: 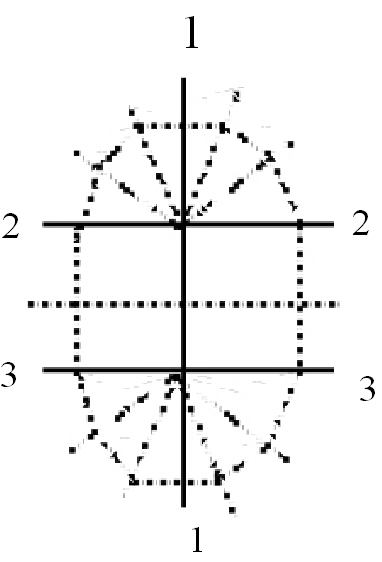
· Control of bags · Noting number of pegs (from bag) · Covering pins when inserting through eyelets 2 · Getting fore and aft guys straight in line with poles · Pegging opposite each other square to poles 3 3 · Ensuring Zips are done up before erecting · And either fully up or fully down later · Working together in a complementary fashion 1
Now issue tents and tell people that points will be awarded according to quality. During pitching, offer advice and , where useful, steal the odd unattended bag or peg. At completion, award points and assemble group for next demo.
The same two leaders now dismantle and pack tent, giving special emphasis to:
· Ensuring zips are fully closed before starting · Folding tent to keep clean surfaces away from dirty ones and minimise creasing · Getting into appropriate shapes to fit bags with minimal rolling · Checking number of pegs before bagging · NOT rolling pegs in tent · NOT hanking guys
Release groups to do the same with their tents and note those who are short of pegs or bags, but don't notice/care. Congratulate as appropriate and remind people they will have a chance to perfect their tent pitching later.
3.3 Practice Weekend #1
3.3.3 Team Navigation Exercise
Objectives
To be a fun way for the teams to compete To rebuild morale lost in failing to find checkpoints in small group exercise To assist in team building To acclimatise people to carrying packs prior to the next day's walk
Materials
A rucsac filled with basic kit for each person At least 2 maps of QE Country Park and 2 compasses per team List of checkpoints (see below) At least one adult per team Two copies of the exercise brief (see Appendix 4) and at least one pen/pencil per team (check each team has a different order of checkpoints!)
Process
Two teams navigate through 10 orienteering points in opposite directions (theoretically passing each other halfway). This is a competition. The first complete team to arrive back at the start with the most correct orienteering post letters on their sheet will be the winner. This will probably not be the first team back . . .
They must be encouraged to take their time – the biggest impact on their speed will be errors in navigating. They must also be encouraged to look after other team members, and to go at a pace that they can all keep up.
Break off to get to the finish (where they started) by no later than 17:00.
The checkpoints and letters are:
3.3 Practice Weekend #1
3.3.3 Stove Safety
Objective
To identify the danger points in using a gas trangia To show how these may be safely managed To show how to avoid heat damage to the cooking area
Materials
A trangia, packed A gas bottle Matches Filled water container Pieces of stick/stones to make a pot stand
Process
Explain objectives - remind group that they will soon be doing this for real. Ask about likely dangers and how burns/scalds should be treated. Show that water is to hand and how it will be used. Ask about hot pans and grass. Show how to make pot stands. Talk about the cooking area (any concrete/stony/sandy areas, need for it to be level, not where people will want to walk, not in tent!). Discuss fire in tents.
Strip and assemble trangia, being sure to hold gas container outlet uppermost when screwing on to gas lead. Show positions of pan supports for billies and frying pan. Set out pot stand.
Put some water in billy. Remove windshield. Strike matches away from you to light. Emphasise that from this point on the gripper will be used for handling any part of the stove - cold or hot. Replace windshield, place billy on supports, put on frying pan/lid. Turn gas on full.
Discuss ways of cooking. Talk about planning (what order things are cooked in), boiling/boiling over (reduce heat), stirring (hold pan with gripper while stirring). Show how to replace gas container when empty (ensure no sources of ignition).
Any questions?
Follow up
Issue food, stoves and gas. Supervise cooking of supper, intervening as necessary.
3.3 Practice Weekend #1
3.3.4 Rucsac packing
Objectives
To know what kit they've got! To ensure that dry kit stays dry To learn what needs to be accessible and what not To demonstrate that they are capable of doing it
Materials
Packed rucsac (from the night before) Tent Trangia
Process
Show how to stuff sleeping bag into stuff-sac Show how to stuff stuff-sac into plastic bag Show how to stuff stuff sac in plastic bag into rucsac Talk about need for waterproofs and water bottle to be handy
Follow up
Supervise and advise on packing
3.3 Practice Weekend #1
3.3.5 Short Walk
Objectives
To give a first taste of walking a significant distance with a significant pack weight To introduce the process of navigating a leg To allow some views to form on the construction of a route
Materials
An 8 or 9 Km route involving an early climb followed by a descent to a rendezvous with the minibus A route card and suitably marked maps/laminated copies
(Appendix 6 is a specimen route which involves the finding of a tumulus by compass bearing and pacing, and an example of closely packed contour lines and their consequences for the careless route designer. The routecard for it forms Appendix 7)
Process
Start the least experienced group half an hour before the other. Nominate a leg leader and a leg back-up. Get the leg leader to: · Read the route card! · Orientate their map
Explain the leg to the group and the features that they will find - ask the group to call out when they see them Ask the back-up to check the work of the leg leader and prepare to lead the next leg.
Monitor the performance of both and intervene at an appropriate time (not too late - it is important that they finish on an up beat.
At the minibus, find opportunities to praise everybody.
Section 3: Sessions
3.4 Wash-ups (reviews)
These will take place after every weekend event.
Objectives
To consolidate learning from the weekends To identify areas where further input/scrutiny is required
Materials
Flipchart and pens Easel or tape
Process
List major objectives of weekend on flipchart Invite and record comments against these and anything else the young people consider important Ask about food and what people would prefer on the next event
Follow-up
Review weekend and wash-up comments with other leaders - modify ongoing programme as appropriate
Section 3: Sessions
3.5 First Aid Training
Objectives
To ensure that a consistent basic course in First Aid is delivered
Materials
Package supplied by a contractor (e.g. ?????)
Process
Provide crowd control for the instructor and support for the participants.
Section 3: Sessions
3.6 Purpose Work/Route planning
3 sessions have been allowed for route planning. This is extremely tight and can only be managed with heavy adult support. Two alternative approaches are described: 'manual' using maps, strings and tracing paper, and 'Anquet', using this mapping software to generate routes and routecard information. Sections 3.6.1, 2 and 3 therefore appear twice, below.
3.6.1 Definition of Purpose and Initial Draft Route ('Manual')
Objectives
To identify the purpose of the expedition To obtain an initial draft of expedition route that will support the chosen purpose
Materials
· 2 maps of the area(s) per group · Soft pencils, sharpeners, rubbers and or acetate pens and solvent · Flip chart · String(s) of appropriate length for route
Briefing
Purpose: Something which gives focus to the venture. 'Clearly defined' and 'pre-conceived'. Must involve some activity during the venture and a report at the end. Ideas: Sponsored walk (need to collect the money!), Survey (people, paths, trees, animals, birds, etc. - need skills to record and summarise). See Appendix 6 Route: Specific purposes require specific routes (e.g. surveys of buildings). More general purposes apply anywhere (e.g. sponsored walk). Bronze: We supply Start/Finish and camp-site (we may vary this once we know purpose). Silver: We suggest start/finish at far east of Forest to facilitate travel. Once we see route we will dig for camp sites.
Process
1. Identify purpose 2. Decide if this demands a specific route 3. Set Bronze S/F and camp/Agree Silver S/F point(s) 4. Use string (1600mm (S) and 1000mm (B) to get an idea of the sort of distance required and to pick some turning points 5. Identify suitable paths linking these points 6. Record waypoints on flipchart
Follow up
Leader to evaluate route distance and suitability (risk, effort required, navigational complexity) and availability of camp sites. Feedback to go to session 2 for modification of route and preparation of routecard info (Place, OS ref, bearing, distance).
3.6.2 Route Card ('Manual')
Objectives
· To obtain a final draft of route(s) · To capture check points · To record initial bearings from, and distance between them · To key into routecard spreadsheet (see Appendix 7)
Materials
· Maps marked with initial route sketches · Compass · Measuring device · Critique by leader, identifying errors, risks, over/under distance, available camp sites, etc.. · Laptop running Excel (one per team) to capture route data
Process
1. Brief team on results of critique, agree changes 2. Identify a computer operator and train him/her 3. Split team into pairs, each with a map 4. Each pair to mark up a section of route (a day?) on their map and to identify checkpoints (clearly recognisable - on map and on ground, between 1 and 2Km apart, no more than 12 per day) 5. Record the place name, grid reference, initial bearing and distance to the next checkpoint, for each checkpoint 6. Key information into computer
Follow up
Session 3 will cover height gain, details of route and escape information.
3.6.3 Route Detail and Tracing ('Manual')
Objectives
To complete creation of route card information To create route tracing for assessor and Outdoor Ed approval
Materials
Map(s) marked with route and checkpoints Leader(s) with pen and paper Lap-top running Fugawi with suitable maps - or tracing paper, masking tape and pencil
Process
Divide the legs by the number of people in the team. Get the team in one by one and get them to do their share of legs. They must describe the route from checkpoint to checkpoint, identifying:
Type of terrain Useful features (points, handrails, collecting features etc.) Height gains Escape routes (phone boxes, buildings etc.)
The leader will record these on paper.
Meanwhile those who have finished their stint will use Fugawi to click on all the turning points in the route to draw the route onto the map, or . . .
Tape tracing paper onto map ensuring that it covers entire route. Mark at least two crosses in diagonal corners of paper over grid intersections and mark the references. Head up the paper with the name of the group, the Award level and the map number and scale. Trace the route, marking the checkpoints, the camp sites and the direction of travel for each day. Draw in the outline of any major features (lakes, towns, etc.). Repeat (one required for Assessor, one for Outdoor Ed).
Follow up
Type the height gains, route descriptions and escape routes into the route cards. Print off a set and send to assessor as soon as possible (according to the book this is already 2 weeks late).
3.6.1 Definition of Purpose and Initial Draft Route 'Tracing' ('Anquet')
Objectives
To identify the purpose of the expedition To obtain an initial draft of expedition route that will support the chosen purpose and that can support the HP2
Materials
· a map of the area per group · Flip chart · Computer(s) running the Anquet mapping software for the relevant area (ideally two machines to get maximum involvement)
Briefing
Purpose: Something to give focus to the venture. 'Clearly defined' and 'pre-conceived'. Must involve some activity during the venture and a report at the end. Ideas: Sponsored walk (need to collect the money!), Survey (people, paths, trees, animals, birds, etc. - need skills to record and summarise). See Appendix 6 Route: Specific purposes require specific routes (e.g. surveys of buildings). More general purposes apply anywhere (e.g. sponsored walk). Bronze: We supply Start/Finish and camp-site (we may vary this once we know purpose). Silver: We suggest start/finish at far east of Forest to facilitate travel. Once we see route we will dig for camp sites.
Process
7. Identify purpose (brainstorm on flipchart if useful) 8. Decide if this demands a specific route 9. Set Bronze S/F and camp/Agree Silver S/F point(s) 10. Use string (1600mm (S) and 1000mm (B) to get an idea of the sort of distance required and to pick some turning points 11. Identify a computer operator and train him/her on Anquet package (i.e. set View, set Scale, find OS reference, 'Start/End path', pull Nodes, move map). 12. Set Anquet to 1:250,000, and Show Information. Draw route crudely (i.e. only turning at significant changes of direction. Check distance, pull nodes about until this is about 80% of requirement. 13. Place start point in middle of screen and switch to 1:50,000 mode. Check that there are suitable paths linking the turning points. 14. Redraw route, following paths around the original line. Check distance and amend as necessary. 15. Shut down the computer(s)
Follow up
Leader to evaluate route distance and suitability (risk, effort required, navigational complexity) and availability of camp sites. Feedback to go to session 2 for modification of route and preparation of routecard info (Place, OS ref, bearing, distance).
3.6.2 Route Card ('Anquet')
Objectives
· To obtain a final draft of route(s) · To capture check points · To record distance between them and height gained · To key into routecard spreadsheet (see Appendix 7)
Materials
· Computer running Anquet with file of first draft routes ('paths') · Computer running the Excel routecard package · Map of relevant area · Compass · Critique by leader, identifying errors, risks, over/under distance, available camp sites, etc. · Two leaders - each skilled in at least one of the packages
Process
7. Brief team on results of critique, agree changes 8. Split team into two groups (swap at end of each day, if possible) 9. Each group to plot a day from the Anquet print onto the paper map, and divide route into up to 12 sections, circling suitable checkpoints (to be well defined - e.g. junctions, turning points, significant landmarks), between 1 and 2Km apart. 10. Show Anquet operators how to plot Waypoints and get them to insert one for each checkpoint, splitting path at each one. Using 'View', 'Information', sing out Place, OS reference, Distance and Height Gained to other group member, who will record in a table on flipchart. 11. Load Routecard and demonstrate by entering first row. Group to enter remaining legs from flipchart table.
Follow up
Print out agreed route map to accompany HP2.
Session 3 will check on ability to derive and apply grid references, and cover bearings, details of route and escape information.
3.6.3 Route Detail ('Anquet')
Objectives
To complete creation of route card information. To ensure maps are marked up.
Materials
Maps of the required area with route and checkpoints marked on them (one per leader) acetate pens and meths/tissues (laminated maps) or pencils and rubbers (paper maps) acetate compass roses leader(s) with pen and paper
Process
Divide the legs by the number of people in the team. Get the team in in pairs. Working alternately, get each one to do their share of legs. For each leg, they must:
a) Give a name to the checkpoint (i.e. the place or what it is, e.g. 'path junction') b) Find the initial direction for the leg (i.e. the direction in which they will set off from the start of the leg). Place the centre of the acetate compass rose on the start point, align N with the vertical grid, pointing to the top of the map, and select the nearest line to the required path. c) Describe the route from checkpoint to checkpoint, identifying: - Type of terrain, including uphill, downhill and steepness - Useful features (points, handrails, collecting features etc.) d) Escape routes (phone boxes, buildings etc.) e) Find the grid reference of a point somewhere along the route (e.g. the escape route destination).
The leader will record these on paper.
When all this is complete, the pair must check that the map is marked up ready for use.
Follow up
Type the route descriptions and escape routes into the route cards. Print off a set and send to assessor as soon as possible. 3.6.4 Purpose Work Planning
Objectives
To expand and refine initial definition of purpose To outline report presentation To decide what will be observed and recorded To devise simple and practical ways of recording To reinforce the need to do all these things
Materials
Flipchart and pens Maps marked with route
Process
Agree and write up definition of purpose Discuss how it can be delivered (output) List things needed to support this (inputs) Consider how these can be captured Devise forms, routines, etc., that involve everybody in doing this Agree who will do what, and how
Follow up
There may be some work required in pre-printing forms, etc. to support this.
Section 3: Sessions
3.7 Practice Weekend #2
Objectives
To reinforce and build on the skills introduced in Practice Weekend #1 To encourage self-management and initiative To experience the practicalities of observing and recording To work on each area of the Country code To simulate and progress an emergency As far as possible to simulate the conditions of the assessment hike
Materials
Route cards for a 2 day hike in similar terrain to the assessed hike Rucsacs complete with basic kit (see Appendix 2) Food Stoves and gas Tents Recording materials where relevant.
Process
Briefing and pre start checks
Ensure everybody understands the objectives of the weekend and, in particular, the requirement for them to demonstrate that they can operate safely without supervision. Tell them that they cannot go for assessment until they have done this.
Issue rucsacs, check weigh after personal kit, food, stoves and tents have been stowed. Adjust as necessary to ensure nobody carries more than a quarter of their body weight.
Help them to mark up maps and check that the routes are correct. Remind them of the routine of navigating a leg: Nominate a lead navigator and a back-up Lead to brief the group (terrain, features, distance, time)
Day 1
Using a light touch, ensure that last leg's back up becomes this leg's lead, and that the pre-leg briefing is carried out. Encourage other team members to look for features.
Use opportunities to reinforce road safety and Country Code requirements.
Give scope to make navigational mistakes and recover from them - giving praise when they do, and reinforcing the good techniques used. Intervene if the consequences of errors will be severe (i.e. discouraging).
Insist on observation and recordings being done in a similar manner to what they have said they would do for their assessment.
At a suitable point, indicate that a person has a non-life threatening problem which will prevent them from walking any further. Invite them to decide what to do. Keep intervention to a minimum, but insist that they telephone the base contact to report the problem (make sure you have pre-briefed the Base Contact!).
Find an opportunity (blisters?) to get them to discuss (or indeed treat) an injury, making sure they examine the first aid kit and consider how they might use it.
Observe team behaviour. How close together are they? Is one person being victimised? Discuss the need to work together. Consider redistributing weight if some people are perpetually 50m ahead of the rest.
In camp pay particular attention to stove safety and conservation issues, especially positioning of stoves, use of grippers, protection of grass from heat and prevention of litter.
See that equipment is cared for, and that pegs are counted.
Before bedtime, brief group on Day 2 and the need to get themselves up, fed and ready for the agreed start time.
Day 2
As far as possible, Day 2 should be completely independent, with leaders present, but passive members of the group. Their role can be likened to assessors, noting what goes on, but only intervening where there is no alternative.
The group must get up, cook, wash up (pans and themselves), pack their kit, check the site for kit and rubbish, and be on their way at the right time. This may not happen (!) and a judgement must be made on the level and type of intervention to be made. Again, err on the light side.
The rest of the day should be the group's, leaders observing and only intervening when necessary because of danger, misbehaviour or running out of time.
Follow Up
It is crucial that a 'wash up' is held to allow the group to reflect on their strengths and weaknesses. Leaders should have prepared their own summaries, and to have concluded whether the group are ready for assessment, or need further practice.
3.8 Pre-Assessment Checks
Objective
To satisfy the assessor that the group are adequately prepared and suitably equipped to undertake the expedition.
Materials
The group and all that they will wear and carry except food. Record books with all necessary information and signatures. Maps and route cards to allow discussion of the route. Menus, indicating amounts and types of food (see Appendix 8). Kit list (see Appendix 2)
Process
6 weeks before the expedition: Send Assessor tracing or map print of route (same time as HP2).
2 weeks before expedition: Send Assessor completed routecards, menus and kit list.
In week before expedition: Arrange for the Assessor to meet the group. Allow an hour. Get the group to lay out their kit to simplify inspection. Introduce the group to the Assessor and vice versa. Reassure them that he/she is there to ensure everything goes well. LEAVE THEM TO IT! (Hard to do, but if you stay you're bound to become defensive!)
Things the Assessor might (should) check:
Route - long enough - distance/time? Planning - the group must have planned the venture. Numbers - must comply with the Award requirements. Territory - unfamiliar - avoiding roads and villages as far as possible? Navigation - any good? Participation - all members will take an active part. Meals - at least one substantial meal cooked each day. Accommodation - camping. Practice Expedition - completed and signed up. Equipment - (including boots) fit for purpose. Venture - must have a purpose. Training - must be properly trained. Provisions - should be self-supporting without the need to visit shops etc. Account of Venture - must be produced to an agreed adult.
3.9 Assessment Hike
The leaders' roles here are restricted to preparing and recovering equipment, transport, safety supervision during the walk (i.e. being aware of where they are, without being visible to the group), and crowd control overnight.
Good liaison with the Assessor during the event is crucial. If the group is plainly incapable of fulfilling the requirements it is essential that the decision to terminate the assessment is taken by, and communicated to the group, by the leaders and not the Assessor. It is the leaders who deemed the group capable, and they must deal with the fall-out when this proves to be wrong.
3.10 Report Preparation and Presentation
It is unlikely that all of the group will be willing/able to participate in the preparation of a written 'account of the journey'. The following procedures are based on experience and have operated with reasonable success.
3.10.1 Bronze
Agree with the Assessor that the group will make a verbal presentation to him/her at the end of the walk. Thus far, we have always used sponsorship as a purpose, and therefore the need to discuss a 'project' has not arisen.
During the overnight stop, discuss the content of the talk, encourage them to take roles (e.g. the weather, navigation, people we met, etc., and in particular - what we learned from doing it!) and try to get them to put some key words on a bit of paper.
At the finish, after the Assessor's de-brief, prod them into regurgitating this. Give suitable encouragement and praise, where you can.
3.10.2 Silver
Ensure that their purpose can be achieved by taking photographs. Strive to get them to record time and location for each one.
Offer them a skeleton Powerpoint presentation, discuss and agree possible changes - additions/deletions. The following is an outline of one used previously:
§ Title Page § Contents § The Group (pictures with bullet points for each person) § The Route (an overview) § The Purpose(s) (Identifying individual roles) § The Diary (strip map of each day, with bullet point descriptions) § Purpose work outcomes (each member presenting his/her pictures) § Conclusions (what went well, what they would do differently next time) § Acknowledgements (for help received) § Any questions?
Get them to supply the bullet points for each page and any other content required
Scan the pictures into Powerpoint at appropriate points and type in the bullets.
Agree on an 'anchor person' and other roles.
Run through the presentation and tweak roles and timing as necessary.
On the night, have a final run through immediately before delivering the presentation.
In 2001 this was achieved in three sessions. A copy of that presentation accompanies this manual.
4. Assessment
5. Forms
6. Useful Sources
6.1 Literature
Award Handbook - The Duke of Edinburgh’s Award, Gulliver House, Madeira Walk, Windsor, SL4 1EU Expedition Guide – by Wally Keay, publisher as above Off-Site activities and Educational Visits – Hampshire County Council Outdoor Education Department
6.2 Links
Kit List
Wear: Windproof top Clothing to suit the weather (if cold, several thin layers are better than one thick one) DO NOT WEAR JEANS!!! Boots (if you've got some that work!) or . . . Trainers that you don't mind wrecking! Watch
Carry: Handkerchiefs ONE complete change of clothing (NO MORE!) Spare socks (for when you get wet feet) Soap, flannel, toothbrush, SMALL towel (e.g. bar towel) Packed lunches and snacks to nibble as you go along Personal medication and first-aid items
We will supply: Waterproofs Hat, gloves Rucsac and plastic liners Sleeping bag Sleeping mat Mug, bowl, knife, fork, spoon Water bottle Survival bag Scourer/wash-up liquid Toilet paper, trowel Head-torch, batteries and spares Maps, routecards Compass Whistle First Aid Kit Tent Cooking stove, billies, fuel, matches Food for evening meal(s) and breakfast(s)
We MAY be able to supply (but only if you ASK): Boots (if we have your size in stock!)
Small Group Navigation Exercise
A competent candidate should be able to do the following: Practical Map Skills a) Setting the map (1) Aligns map with point features. b) Setting the map (2) Aligns the map with line feature(s). c) Directions from map Uses set map to identify general directions and line of route. d) Position Uses features to estimate position f) Following a route Assesses each leg before starting (direction, terrain, distance, time) Ticks off features Compass Skills a) Cardinal/inter-cardinal (4) Can recite/identify position between. b) Setting the map Can orientate the map by compass c) Care Protects from physical damage and magnetic interference. You will need: Map of QE Country Park, Compass, 2 or 3 young people, list of checkpoints (see below).
1. Spend some time making sure that each person understands the basic symbols of map (paths, fenced/unfenced roads, types of forest, Grid Lines (size of squares and direction). The red blobs are about 100m in diameter, with the appropriately marked and numbered post in the centre of the circle. 2. For each candidate, follow the same process. Get them to § Set map (using compass or features) § Plan a route § List any useful features (including ones that show they have overshot) § Estimate time (assume 20 minute Kms) § Follow the planned route (ticking off features) § Relocate when unsure of position (get them to do this a lot!) 3. Relocation strategy is to: c) Re-set map and look for relevant features and, if none, d) Walk on a fixed bearing (N, S, etc.) until striking a likely line feature, then restart at a). 4. Do the highlighted row of Orienteering points in the set sequence, with candidates taking turns:
5. Take opportunities on tarmac roads to check highway code. 6. Break off in order to be at the toilets no later than 13:30 (subject to change if start time slips). 7. As far as possible, KEEP IT SIMPLE! Team Navigation Exercise (Team 1)
You will need: At least 2 maps, 2 compasses, at least one adult, list of checkpoints (see below) and a pencil.
This is a competition between the teams. The first complete team to arrive back at the start with the most correct orienteering post letters on their sheet will be the winner. This will probably not be the first team back . . .
Take your time – the biggest impact on your speed will be errors in navigating. Look after other team members, go at a pace they can all keep up.
Do the posts in the set sequence, and write down the letter you will find on each post.
You must be back where you started no later than 5:00 pm, so if it’s getting near then you’ll have to break off and head back . . . always assuming you know where to go!
Your checkpoints are:
Portsmouth Outdoor Education Unit – Expedition Training
Team Navigation Exercise (Team 1)
You will need: At least 2 maps of QE Country Park, 2 compasses, at least one adult, list of checkpoints (see below).
This is a competition between the teams. The first complete team to arrive back at the start with the most correct orienteering post letters on their sheet will be the winner. This will probably not be the first team back . . .
Take your time – the biggest impact on your speed will be errors in navigating. Look after other team members, go at a pace they can all keep up.
Do the posts in the set sequence, and write down the letter you will find on each post.
You must be back where you started no later than 5:00 pm, so if it’s getting near then you’ll have to break off and head back . . . always assuming you know where to go!
Your checkpoints are:
Team Navigation Exercise (Team 2)
You will need: At least 2 maps of QE Country Park, 2 compasses, at least one adult, list of checkpoints (see below).
This is a competition between the teams. The first complete team to arrive back at the start with the most correct orienteering post letters on their sheet will be the winner. This will probably not be the first team back . . .
Take your time – the biggest impact on your speed will be errors in navigating. Look after other team members, go at a pace they can all keep up.
Do the posts in the set sequence, and write down the letter you will find on each post.
You must be back where you started no later than 5:00 pm, so if it’s getting near then you’ll have to break off and head back . . . always assuming you know where to go!
Your checkpoints are:
Portsmouth Outdoor Education Unit – Expedition Training
Team Navigation Exercise (Team 2)
You will need: At least 2 maps of QE Country Park, 2 compasses, at least one adult, list of checkpoints (see below).
This is a competition between the teams. The first complete team to arrive back at the start with the most correct orienteering post letters on their sheet will be the winner. This will probably not be the first team back . . .
Take your time – the biggest impact on your speed will be errors in navigating. Look after other team members, go at a pace they can all keep up.
Do the posts in the set sequence, and write down the letter you will find on each post.
You must be back where you started no later than 5:00 pm, so if it’s getting near then you’ll have to break off and head back . . . always assuming you know where to go!
Your checkpoints are:
Ideas for 'Purpose Work'
Antiquities Beetles Birds
Boots Bridges Buildings Butterflies Campcraft
Cartography Churches Conservation Coppicing
Craft hand tools Wood/hedge dating
Example of a Short Walk for Practice Weekend #1
Specimen Menu Document - Silver Expedition
Day 1
Food
Calories
Price
Lunch: Sandwiches Apple
Supper: Wayfarer Chili con Carne Wayfarer Fruit Pudding in Butterscotch Sauce
'Walking rations': 'Harvest Crunch' bars Nut & Raisins Wine gums
Day 2
Breakfast: Waitrose Farmhouse Breakfast
Lunch: Pitta bread Cheese slices Apple
Supper: Wayfarer Lancashire Hot Pot Wayfarer Chocolate Pudding
'Walking rations': Jordans Muesli Bars Mixed dried fruit Jelly babies
Day 3
Breakfast: Waitrose Country Supper
Lunch: Pitta bread Some other filling Some other fruit
'Walking rations': Chocolate Hob Nobs Breakfast bars Liquorice Allsorts
|
|||||||||||||||||||||||||||||||||||||||||||||||||||||||||||||||||||||||||||||||||||||||||||||||||||||||||||||||||||||||||||||||||||||||||||||||||||||||||||||||||||||||||||||||||||||||||||||||||||||||||||||||||||||||||||||||||||||||||||||||||||||||||||||||||||||||||||||||||||||||||||||||||||||||||||||||||||||||||||||||||||||||||||||||||||||||||||||||||||||||||||||||||||||||||||||||||||||||||||||||||||||||||||||||||||||||||||||||||||||||||||||||||||||||||||||||||||||||||||||||||||||||||||||||||||||||||||||||||||||